 |
 Circle of Life
I've also changed up my QRO line-up. I have the FT-5000DX which is a wonderful radio. It does however take up a fair amount of real estate on my, not-so-big, desk. Along with VL-1000 amp, I don't have much room left over. So, I am sending the FT-5000 to my ranch station and replacing it at the home shack with a K3. Not a bad trade. I just received the K3 and am getting comfortable with it. Having owned a KX3 for while, the learning curve is not too steep. There is another agenda here and that is I want to be able to remote into my home station when away and Elecraft has an elegant solution for that. They build a K3/0 which looks just like the K3 but without the TX and RX circuitry. So when remote, you have the same front end to play with. Plug in your key, link up, spin the knobs and away you go. At least that's the theory. I will be setting this up soon and I will report on the progress.
So the circle of life is always with us, which makes life interesting.
Mike Crownover, AD5A, is a regular contributor to AmateurRadio.com and writes from Texas, USA. Contact him at [email protected].
AmateurLogic 64: Vegemite or Die!

AmateurLogic.TV Episode 64 is now available for download.
Peter sends Tommy and George some Australian treats. See how they react to Vegemite.
George has an introduction into cheaply receiving and decoding digital signals.
Peter brings us the Making of AmateurLogic Downunder.
Tommy builds an Arduino Heads-Up display for use with rigs that have Cat ports and more.
1:16:45 recorded live before an Internet audience.
View in web browser: YouTube
George Thomas, W5JDX, is co-host of AmateurLogic.TV, an original amateur radio video program hosted by George Thomas (W5JDX), Tommy Martin (N5ZNO), Peter Berrett (VK3PB), and Emile Diodene (KE5QKR). Contact him at [email protected].
Datamode Interface built
To transmit and receive digital/data modes you need to connect the radio audio in/out to the computers sound card in/out, the computer then runs the necessary software to encode/decode the signals. I want to try out WSPR, PSK, JT65 and some SSTV for starters I have spent too long just receiving and decoding...
There are a number of inexpensive commercial interfaces available, but many of them use the same basic design originally intended for eQSO/Echolink operation. I nearly succumbed but I had built an eQSO interface many years ago when using PMR446 and had most of the parts to build another.
I nearly took the easy route and got a commercial one since connecting up some home built circuitry to a £20 hand held is slightly less daunting than plugging it into an expensive rig! My original interface has been modified and reused over the years and was a bit of a mess, but being brave I decided I could tidy it up and I couldn't really damage anything if I took my time... actually the truth was I discovered I didn't have the necessary optocoupler IC so couldn't build a new one just yet...
A simple internet search for digital/data mode interfaces will bring up a great deal of information, schematics and ideas for home brew solutions. The basics can be found here for example.
The simplest form of interface is just a simple direct lead with the transmitter operating in VOX mode. However levels can be a problem as the line/speaker output from a computer can be too high for a transmitters microphone input. Also connecting a radio to a computer directly can lead to problems with ground loops and interference.
The computer can be made to control the Push-To-Talk (PTT) on the transmitter using a serial port with the software controlling one of the handshake lines (RTS/DTR) Some data mode software support CAT to allow control of the PTT as well as tuning the transmitter, but the serial port method is more universal.
The preferred interface, and the one I had built isolates the computer from the radio by using two audio transformers and an optocoupler. There is no direct connection between the two devices so keeps interference to a minimum.
I could have used the microphone and speaker output on the radio, but the FT-857D has a convenient data connector on the back. This is a 6-pin DIN socket as used by older (PS/2) computer keyboards/mice. Note the diagram shown in the FT-857D manual (as below) is the view as you look at the socket.
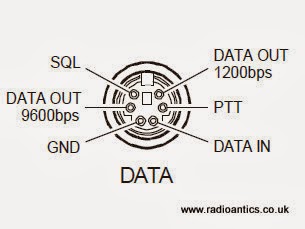 |
| FT-857D Data connector as in the manual |
Like many people I initially thought I could cut a lead off a mouse/keyboard and repurpose it, however I discovered most only use four wires and they don't use the necessary pins! You might be lucky especially with older keyboards or alternatively if you have an old keyboard extender cable they usually have all six wires present. Alternatively the plugs are readily available from the likes of CPC/Farnell.
I had a hunt around in a junk box and located a suitable keyboard extender cable. I chopped off the useless end and metered out the pins to identify the appropriate wires. Remember when looking at the plug the pins are swapped left-to-right compared to the diagram which is the socket view.
Well here is the insides of the interface.. and as you can see I completely failed to tidy it up! Not my best work, but I did put it in a new box and I did tape up all those unused wires!
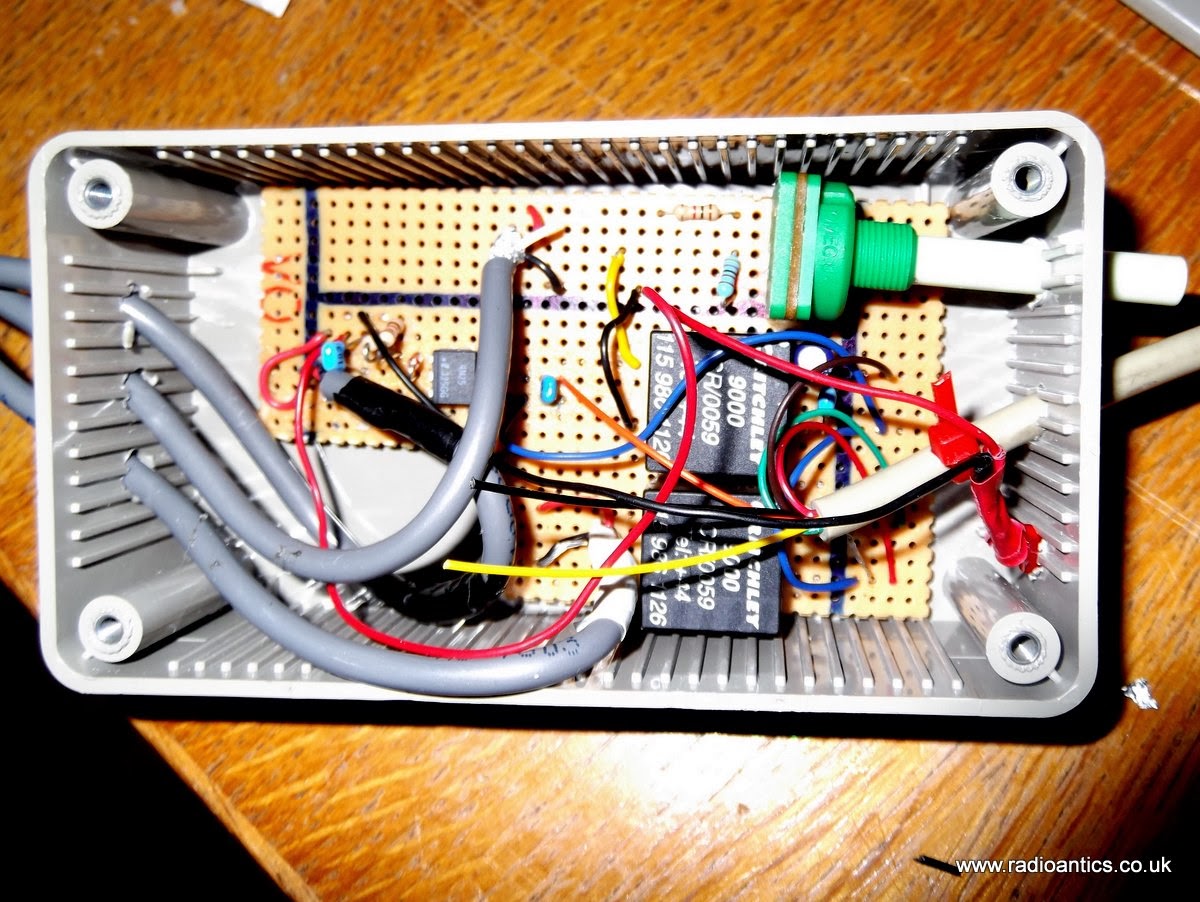 |
| The messy internals of the interface |
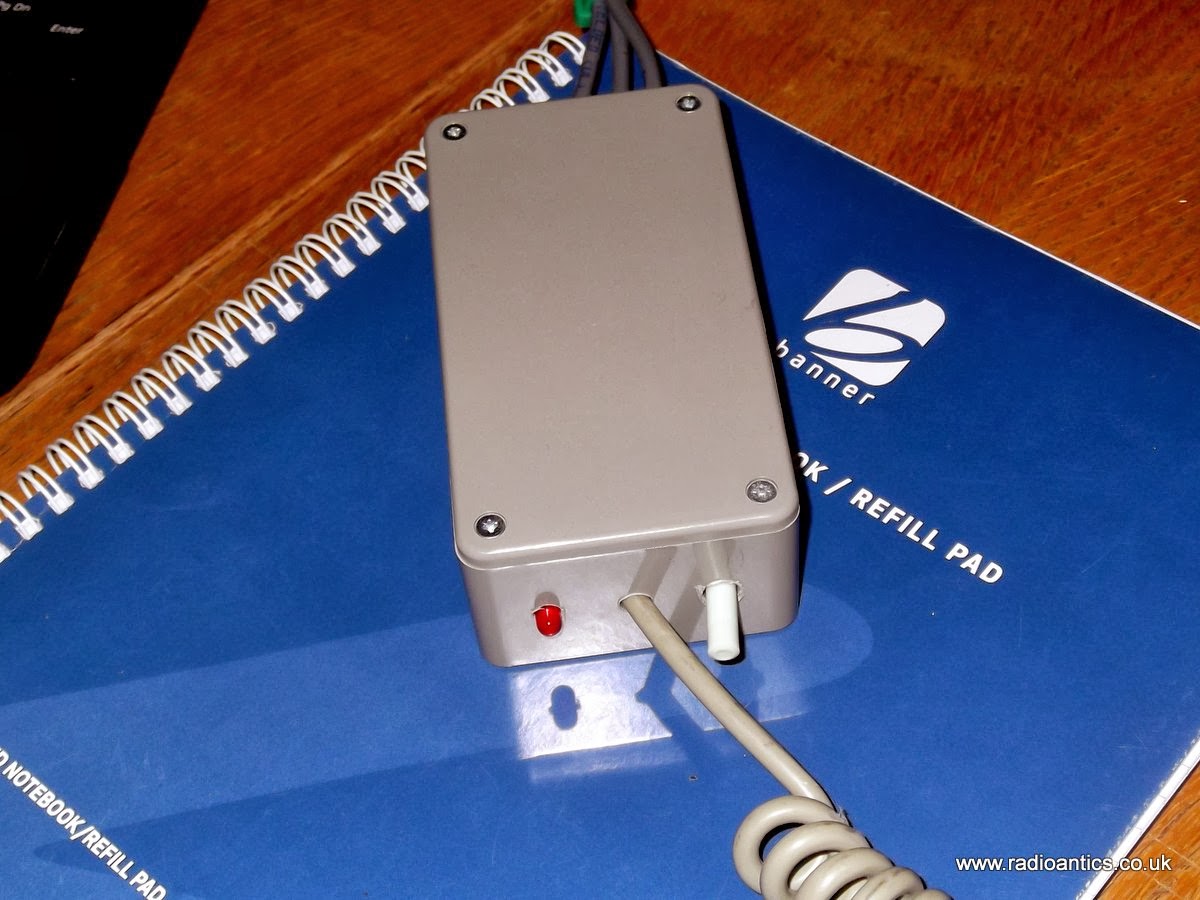 |
| It looks better with the lid on.. |
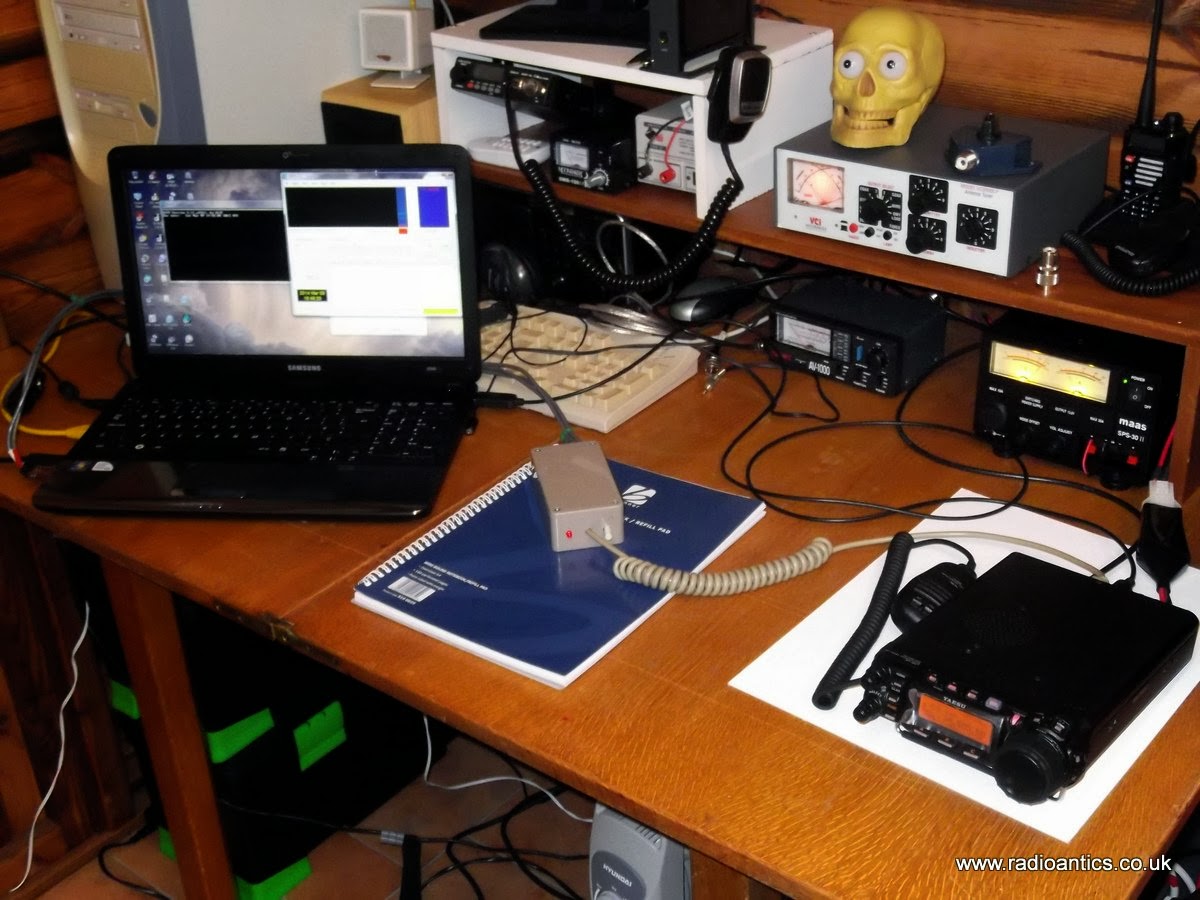 |
| Computer, radio and interface |
It was straight forward setting up WSPR to use a combination of CAT for tuning and the RTS PTT control and soon had some encouraging results, in fact these are some of the spots of my 5W signal on 10m/20m and 30m, I was grinning from ear to ear!
 |
| 10M Spots |
 |
| 20M Spots |
 | |
| 30M Spots |
Looking forward to spending some more time experimenting with the data modes.
Andrew Garratt, MØNRD, is a regular contributor to AmateurRadio.com and writes from East Midlands, England. Contact him at [email protected].
Ham Radio HT Programming

OK, now this is a pretty cool service.
My friend Clint Bradford, K6LCS, has opened a website where he is offering to program almost any HT you can think of for $35. The website is called HamRadioProgramming.com.
The process is very straightforward. You mail him your radio, he’ll program up to 60 memory channels of your choice, and he ships it right back via USPS Priority Mail. Don’t know the frequencies outside your immediate area? Clint will look them all up and program them in. Pretty darn slick.
Now, when I first heard about it I thought to myself, if you’re smart enough to pass an amateur radio exam, shouldn’t you be smart enough to program an HT?
Well, first it’s not really about being smart enough. My first HT was a little Kenwood TH-27A and honestly, it wasn’t that hard to program. Things were different in the old days! 🙂 Fast forward twenty (plus) years, my Wouxun and Baofeng radios are a different story. If hadn’t purchased the programming cable, learned the software, figured out how to get the drivers to work with the radio, etc., I’m not sure my radios would have ever been programmed. In fact, I’ve never been able to program my Baofeng UV-3R because I couldn’t get the drivers to work. Could be just me, but it can be a real pain.
But, let’s say you’re not intimidated by learning new software and tweaking around with USB drivers. This service still makes a lot of sense for those who don’t do a lot of programming because you save the cost of buying those foolish programming cables. I have a different one for both my Wouxun and Baofeng radios and I think I paid $15 for each one.
If you want to save yourself a bunch of time, technical headaches, and the cost of a programming cable, take a look at what he’s offering. If you’re not interested, I bet you know someone who might be.
Matt Thomas, W1MST, is the managing editor of AmateurRadio.com. Contact him at [email protected].
Specs announced for Wouxun KG-UV8D


BuyTwoWayRadios.com released a flyer on Friday detailing some of the specifications for the Wouxun KG-UV8D.
At first glance, the specifications of the KG-UV8D above appear virtually identical to the Wouxun KG-UV6X (if someone can spot a difference, please let me know).
BuyTwoWayRadios.com has confirmed that they plan to offer the radio at $139.99 and will begin taking pre-orders this week. The KG-UV6X is $169.99 at Powerwerx (but also includes a dual-slot rapid charger at no extra charge).
Source: BuyTwoWayRadios.com blog via Brick O’Lore
Matt Thomas, W1MST, is the managing editor of AmateurRadio.com. Contact him at [email protected].
Non-English display for the K3NG Arduino Morse keyer
German, Swedish, Danish, Norwegian, Finnish, and some Spanish characters in the display are now supported by the K3NG Arduino Open Source Morse keyer. I have worked with OZ1JHM, Hjalmar and K3NG, Anthony, in order to implement this using the 8 custom-designed characters of the LCD display (based on the Hitachi HD44780). This should satisfy the call I had for such support here on this blog last year: Which non-English Morse characters are the most important ones?
Here are examples using the phonetic alphabets of these languages.
- For Norwegians and Danes – Æ, Ø, Å:
- For Swedes and Finns. But if you are not, then perhaps you still need to send your shopping list of IKEA products in Morse? – Å, Ä, Ö
- For Germans – Ä, Ö, Ü:
|
|


|
|


 |
| German: Ärger Ökonom Übermut |
 |
| España |

The most likely combinations of characters are:
- Æ, Ø, Å, Ü, Ñ for Danish/Norwegian.
- Ä, Ö, Å, Ü, Ñ for German/Swedish/Finnish.
It should be noted that Ö=Ø and Ä=Æ when it comes to Morse code (and meaning).
It is also possible to support the CH which has its own Morse code (—-), but so far I haven’t been able to find a symbol that represents this letter. Neither should it be much of a problem to support other letters also, such as French accents and the C cedilla (À, È, É, Ç). All it takes is to generate a bit pattern using an editor such as the one provided here and replace some of the above characters.
I am very happy for the collaboration that took place to make this possible and not the least to Anthony, K3NG for making his work available and his willingness to accept ideas for changes and improvements. For the time being, this feature is in the beta version, but hopefully it will eventually find its way into the official version. It can be enabled by uncommenting:
- #define OPTION_NON_ENGLISH_EXTENSIONS
- #define OPTION_DISPLAY_NON_ENGLISH_EXTENSIONS
Sverre Holm, LA3ZA, is a regular contributor to AmateurRadio.com and writes from Norway. Contact him at [email protected].
Aircraft scatter propagation and the Air Scout software by DL2ALF
This morning as I was putting the Practical Wireless column together and in particular, some microwave reports, I remembered that sometime ago I had heard about the Air Scout software by DL2ALF. This software uses data from FlightRadar24.com and plots it on a map. Not only that, but you can enter in your locator, the target station’s locator and the software will give you an idea of when there are aircraft in the right place to reflect the signals and enable a brief contact.
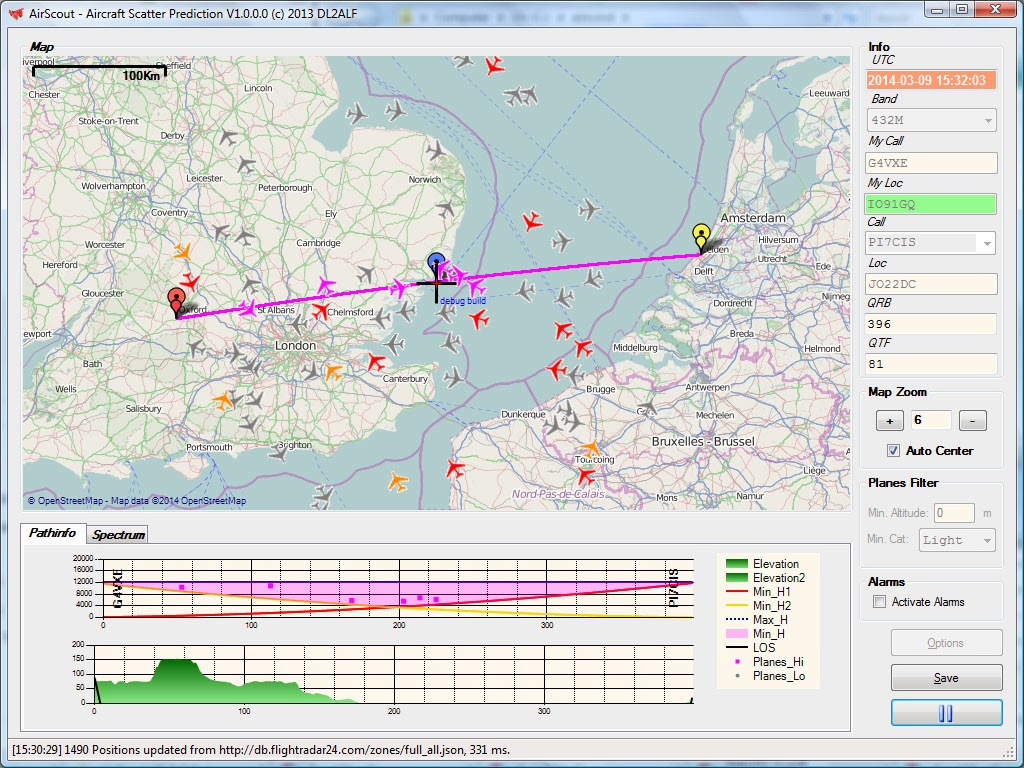
The first path I tried was quite a simple one, from here to the GB3VHF beacon on 144MHz. Although I can hear it all the time, even on the collinear, it is very quickly apparent when there are aircraft on the path, by the Doppler shift. It didn’t take long for me to see that the software was working and aircraft reflections were being heard at ‘the right time’.
A more challenging path was the 432MHz one from here to PI7CIS in JO22. At the moment, with the 10el yagi, I am not hearing the beacon all the time, so I left the FT847 running with the beam pointing towards Holland and after a few minutes, I heard a weak signal from the beacon. Sure enough, referring back to the AirScout software, there was an aircraft along the path.
Very interesting! I must look at this software a little more and see if I can learn a little more about how I might use it to make some aircraft scatter contacts.
You can download a copy of AirScout here
Tim Kirby, G4VXE, is a regular contributor to AmateurRadio.com and writes from Oxfordshire, England. Contact him at [email protected].
 Ham Radio Deluxe |
 W5SWL Electronics |
 Ham Radio Prep |
 KB3IFH QSL Cards  Hip Ham Shirts  HamRadioAuctions HamRadioAuctions Reliance Antennas Reliance Antennas Enigma Shop Enigma Shop |  morseDX  Ni4L Antennas  R&L Electronics R&L Electronics antennas.us antennas.us QRV QRV |
- Matt W1MST, Managing Editor
