 |
 Another rig for (almost) £30 – the Baofeng UV-3R plus
A few days ago, I was chatting to a friend on the repeater about the Baofeng UV-3R and what a useful radio it was. He was interested in getting one, but explained he didn’t use eBay. Rather than have him pay £50 in the UK, I said I would order him one.
It arrived today. I had ordered a UV-3R Plus, rather than my Mark 1 model. What are the differences?
The Plus has dual band display. In practice, I don’t think this is a big deal.
The Plus came with a dual band antenna rather than two mono band antennas
The Plus comes with a drop in charger. The charger tray can be powered from the USB style charger that comes with the rig, although I plugged the lead to an iPhone charger.
Although it is entirely adequate, I feel the build quality on the Plus is not quite as good as the Mark 1. What do I expect for £32.90?
Although I have not had any QSOs – it is my friend’s rig, after all, performance of the rig seems as good as the Mark 1. I was able to blip up GB3TD and GB3UK from inside the house.
The Plus came with two earpiece/ microphones – the standard one and an added bonus.
I hope my friend will be pleased with it!
Tim Kirby, G4VXE, is a regular contributor to AmateurRadio.com and writes from Oxfordshire, England. Contact him at [email protected].
Today’s QSO with KØLR, Who Gave Me My Novice Code Test in 1978
My online ARRL course, “Introduction to Emergency Communication,” is in full swing. I’m happy to say that it is pretty demanding. Not that the material itself has been especially difficult (yet), but the essay-assignments do require some thought — and other assignments are pushing me to do some new things on the air, like listening to several nets, critiquing an NCS (Net Control Station), and checking into a net (okay, I probably have checked into a net or two over the years, but it’s been so long that I hardly remember doing it).
Today I reaped some unexpected benefits from one of these assignments. Having been assigned to check into a formal net, I checked into the PICONET this morning. This was no small feat, since it was on 75 meters. My New Carolina Windom is only cut for 40 meters, and the automatic tuner on my Kenwood TS-440S has never been able to match it — the SWR is terrible! But using my old Drake MN-7 Matching Network, I was able to match it surprisingly well. So now I’m on 80/75 meters! I even made a CW contact with a fellow in Wisconsin, and got a decent signal report.

Lyle Koehler, KØLR, with Katharine Lord, KØTHY (photo copied from the PICONET website)
And after checking in this morning, I visited the PICONET website — and learned that Lyle Koehler, KØLR, would be the NCS for the PICONET this afternoon! Wow! Lyle is the ham who gave me my Novice code test back in 1978. I was only 10 years old, but I remember it like it was yesterday. I’ll never forget how I shook like a leaf on the couch in his living room while he sat beside me and tapped out 5 wpm code with a straight key and oscillator. When he told me I passed, I couldn’t wipe the grin off my face for the rest of the day!
So the thought of talking with Lyle again after all these years was enough to make me watch the clock, eager for the PICONET to open again at 1500 CDT. And sure enough, at the appointed hour I heard Lyle’s voice as he opened the net! I was his first check-in, and I took advantage of the net’s slow start to explain that he had given me my Novice code test over three decades ago. He remembered me!
What a pleasure to meet this fellow on the air after all these years.


![]()
Todd Mitchell, NØIP, is a regular contributor to AmateurRadio.com and writes from Minnesota, USA. He can be contacted at [email protected].
Ham Nation 40

http://dts.podtrac.com/redirect.mp4/twit.cachefly.net/video/hn/hn0040/hn0040_h264b_864x480_500.mp4
http://dts.podtrac.com/redirect.mp4/twit.cachefly.net/video/hn/hn0040/hn0040_h264b_640x368_256.mp4
http://www.podtrac.com/pts/redirect.mp3/twit.cachefly.net/hn0040.mp3
Hosts: Gordon West (WB6NOA) and George Thomas (W5JDX)
A visit to the Last Man Standing stage for a radio event, a demonstration and world tour of the WIN System, building a custom box for your home-made devices, and more.
Guests: Jeff “Shorty” Stouffer (K6JSI), John Amodeo (NN6JA), Ray Novak (N9JA), Julian Frost (N3JF), Marty Woll, Amanda Alden (K1DDN), and Cheryl Lasek (K9BIK)
Download or subscribe to this show at http://twit.tv/hn.
We invite you to read, add to, and amend our show notes at wiki.twit.tv.
Thanks to Joe Walsh who wrote and plays the Ham Nation theme.
Thanks to Cachefly for the bandwidth for this show.
Dr. Bob Heil, K9EID, is the founder of Heil Sound and host of TWiT.tv's Ham Nation which streams live each Tuesday at 6:00pm PT (9:00pm ET) at http://live.twit.tv. Contact him at [email protected].
MITx – MIT’s new learning initiative – free online courses!!
I’ve mentioned similar courses in the past, but here’s a new twist….. you’re not just watching videos of lectures, you can actually participate.
Here is a description of the purpose of the MITx program, from MIT:
“MITx will offer a portfolio of MIT courses for free to a virtual community of learners around the world. It will also enhance the educational experience of its on-campus students, offering them online tools that supplement and enrich their classroom and laboratory experiences.The first MITx course, 6.002x (Circuits and Electronics), will be launched in an experimental prototype form.
Watch this space for further upcoming courses, which will become available in Fall 2012.”
The Circuits and Electronics course has already started. Though I can’t participate at this time, I did notice I could still click on the link and enroll.
If you have the time, check it out. Maybe come back and give us some feedback on the experience. The link to the course is:
Jonathan Hardy, KB1KIX, is a regular contributor to AmateurRadio.com and writes from Connecticut, USA. Contact him at [email protected].
Ham Radio and Mesh Networks
Lately I’ve been fascinated by the capabilities of mesh networks. The ability to quickly create ad-hock computer networks could be an invaluable resource for amateur radio operators in general and particularly for emergency communications (EMCOM)

The particular device and software I have been experimenting with is the Linksys WRT54G router and HSMM-MESH firmware from http://hsmm-mesh.org/.
Installing the HSMM-MESH firmware changes the way the Linksys router functions and allows it to automatically connect to other HSMM routers in a mesh network. No special configuration is required after setting your callsign. All TCP/IP configuration is pre-configured, even down to automatically assigning addresses to connecting clients.

Mesh networks are highly fault tolerant. Every router in the network is aware of every other router and has the ability to move network packets through from one unit to another provided there is a link, or chain of linked routers, between them.
In the diagram to the right each router is represented by a numbered circle. If router number 6 were to fail then network packets that needed to move between router 1 and 7 would travel through routers 2 & 3 or 5 & 10 until 6 was repaired. All this happens automatically and quickly enough so that there is no disruption to the traffic.
Anything you can access on a normal computer network can be made to work on a mesh network. Some of the services that have been demonstrated include email, voice over IP (VOIP), video conferencing, file sharing, web servers & groupware applications.
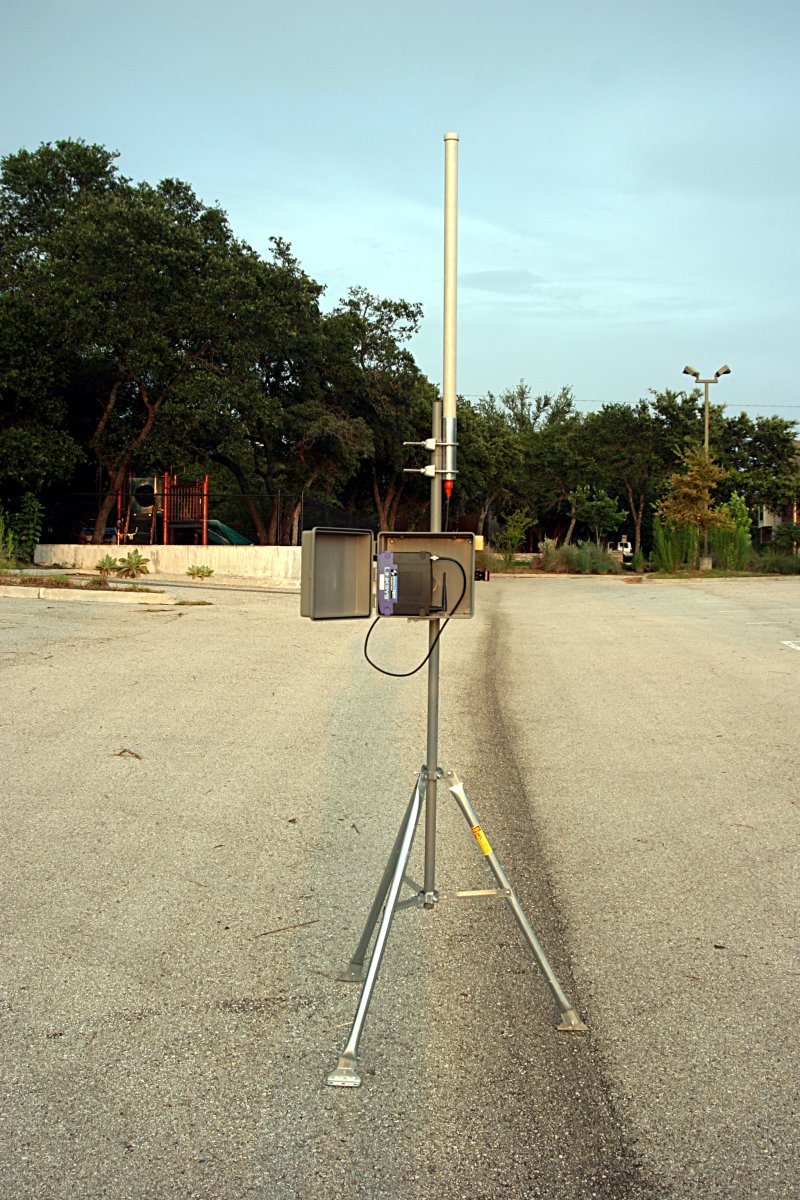 With simple modified antennas the modest output power from the WRT54G (100 to 200mW) can be used to reach distances of many miles or tens of miles with directional antennas. Mounting the router on a mast in a sealed enclosure can reduce losses from long cable runs while running off 12V power makes them compatible with ham radio power sources including solar and wind power.
The example to the left is from NG5V located on hsmm-mesh.org and consists of an omni-directional external antenna and a lawn sprinkler controller box from a popular home improvement store.
Did you know that … Frequencies used by channels one through six of 802.11b and 802.11g fall within the 2.4 GHz amateur radio band. Licensed amateur radio operators may operate 802.11b/g devices under Part 97 of the FCC Rules and Regulations, allowing increased power output but not commercial content or encryption.
I hope to acquire a few more WRT54G routers and put together a mesh network in the Katy TX area as a resource for experimentation and education in an area not normally touched upon by regular amateur radio operators. Who knows what the future holds & it behooves us to investigate this technology and bend it to our own needs.
The Amateur is Progressive … He keeps his station abreast of science. It is well built and efficient. His operating practice is above reproach.
Owen Morgan, KF5CZO, is a regular contributor to AmateurRadio.com and writes from Texas, USA. Contact him at [email protected].
Handiham World for 21 March 2012 Repost
Welcome to Handiham World.
Digital Bling and a Cautionary Tale
The news this week about QST going digital is exciting stuff. (See the next story for an explanation and link.) If our own Handiham World had not gone digital, we would still be publishing only four issues a year, one for each season. Yes, back in the bad old days a couple of decades ago the Handiham World was mailed out each Spring, Summer, Autumn, and Winter in a print format. Volunteers would read the print version onto cassette tapes that were mailed to our blind members. Any news that arrived via that system was bound to be pretty old. Then, when printing and mailing costs began to climb we had to cut down to three issues, then two. Using the Internet to deliver the Handiham World was faster, cheaper, and better. Not only could it be read directly with screenreading software by our blind members, but it could be in audio as well, also delivered via streaming or download. Members could even call a phone number to hear the same Internet audio, even if they only had a telephone. The Handiham World could be enjoyed by anyone as a podcast from iTunes. Better yet, it could be published weekly instead of quarterly.
Even though these advantages seem obvious, there were – and still are – some who feel that our service has left them behind. These are the members who don’t have computers and who don’t plan to get them. And this, my friends, is the problem every publisher faces. That is why I’m going to share with you my experience with a newspaper.
It is certainly not news that newspapers want to print: Newspapers are struggling to find their new business model in the 21st century. Who reads them anymore?
Probably people like me, that’s who! I’m old enough to remember having a paper route as a kid. Delivering the daily paper was one of those rite of passage jobs a kid could have back in the middle of the 20th century. The news business was less competitive back then, and there was little urgency to have up to the second updates. The newspaper business held its own until cable news began nipping at its heels, but it wasn’t until news sites began appearing on the Internet that the real problems with printing paper copies and physically dumping them on doorsteps became too big to ignore.
These days we would get our newspaper delivered by some guy driving his personal vehicle around town and pitching the paper out onto the driveway or sidewalk. He would back over the lawn and sometimes his truck would have a loud muffler in the wee hours of the morning. Often as not the morning dew or the lawn sprinklers would soak the paper before we could retrieve it. On rainy mornings the paper arrived in a plastic bag that managed to protect about 3/4 of the paper from getting soaked. The newspaper company also published an on line edition once the power of the web was obvious, and like many other readers I took to it instantly and never looked back. Unfortunately for the newspaper, they lost money giving the news away for free on the web (duh), and they finally had to come up with a pay-for alternative. It involved a special digital edition that looked just like the printed version. In a scattergun approach to pleasing every customer from the grumpiest computer-hating Luddite to the early-adopter geek, they offered a plan to give you a print paper AND a digital edition.
We signed up. I like trying new stuff but I still like a print edition. This would be a chance to compare the technologies.
It’s been a couple of months now, so I feel as if I know where things are going. Both my wife and I read the print paper to some extent, and both of us use the newspaper’s website. The website is actually easy to use, but it is not the new so-called “digital edition” that looks exactly like the printed paper. For that, you have to log on to a special website. The newspaper sends a helpful link by email each day as a reminder. The digital look alike loads a web application in your browser window, after which you see the copy of the printed version in what amounts to a browser frame. Try as I might, I just cannot warm to the idea of trying to read a newspaper that way. The page does not all fit in the browser window, which means that you are constantly scrolling one way of another to read articles. Worse yet, because the digital look alike is supposed to be like the printed copy, you have to follow the story onto other pages buried deep in that day’s edition. The pages of the digital edition have a feature that prompts you with a cute little animation to turn them. Page turns themselves are also animated. Ooooo! This is digital bling! It looks so cool, but let’s face it – I think having to scroll left and right and up and down, then fiddle with the mouse to get the cursor exactly in the right spot to connect me to the remainder of a front-page article that ends up buried on page 10 is just not my cup of tea. What I want is content. I would like it to be easy to find, easy to read, and – after being in the business of helping people with disabilities for so many years – accessible to people who use screenreaders. I have to say that some of these new digital publishing efforts fall flat on all those counts.
What I don’t really understand is the need to make a digital edition look like a printed page. The printed page is fine when it is a printed page. When it is a digital copy on a small screen, it is like putting Victorian furniture in a Frank Lloyd Wright house. It is a bad fit. If you are going to use the web to publish your newspaper, publish it using the easily understood, common, and highly accessible web page formats that are already available. That is why for Handiham World we provide accessible HTML in our web pages. If we put something up in a format like PDF, it contains embedded text and an audio alternative, plus an HTML version. But really, the PDF version is not meant so much to be read on line as to be printed and read as a print publication.
The bottom line with digital publishing is that it needs to be recognized for what it really is – a new and better way to deliver content that is more up to date, cheaper to deliver, and takes advantage of the technology to allow users to search thousands of pages quickly, have access to past issues without collecting an attic full of paper copies, and enjoy it all with accessible technology. It is not a new way to deliver the same old paper dressed up with page turn animations. In other words, forget the bling and give me the content.
Oh, well. At least the digital version does not drive over my lawn at 4:00 A.M. in a noisy truck. On the down side, I miss the plastic bag that is so handy for “dog duty” when I take Jasper out for a walk.
For Handiham World, I’m…
Patrick Tice, [email protected]
Handiham Manager
Pat Tice, WA0TDA, is the manager of HANDI-HAM and a regular contributor to AmateurRadio.com. Contact him at [email protected].
Handiham World for 21 March 2012
Welcome to Handiham World.
Digital Bling and a Cautionary Tale
The news this week about QST going digital is exciting stuff. (See the next story for an explanation and link.) If our own Handiham World had not gone digital, we would still be publishing only four issues a year, one for each season. Yes, back in the bad old days a couple of decades ago the Handiham World was mailed out each Spring, Summer, Autumn, and Winter in a print format. Volunteers would read the print version onto cassette tapes that were mailed to our blind members. Any news that arrived via that system was bound to be pretty old. Then, when printing and mailing costs began to climb we had to cut down to three issues, then two. Using the Internet to deliver the Handiham World was faster, cheaper, and better. Not only could it be read directly with screenreading software by our blind members, but it could be in audio as well, also delivered via streaming or download. Members could even call a phone number to hear the same Internet audio, even if they only had a telephone. The Handiham World could be enjoyed by anyone as a podcast from iTunes. Better yet, it could be published weekly instead of quarterly.
Even though these advantages seem obvious, there were – and still are – some who feel that our service has left them behind. These are the members who don’t have computers and who don’t plan to get them. And this, my friends, is the problem every publisher faces. That is why I’m going to share with you my experience with a newspaper.
It is certainly not news that newspapers want to print: Newspapers are struggling to find their new business model in the 21st century. Who reads them anymore?
Probably people like me, that’s who! I’m old enough to remember having a paper route as a kid. Delivering the daily paper was one of those rite of passage jobs a kid could have back in the middle of the 20th century. The news business was less competitive back then, and there was little urgency to have up to the second updates. The newspaper business held its own until cable news began nipping at its heels, but it wasn’t until news sites began appearing on the Internet that the real problems with printing paper copies and physically dumping them on doorsteps became too big to ignore.
These days we would get our newspaper delivered by some guy driving his personal vehicle around town and pitching the paper out onto the driveway or sidewalk. He would back over the lawn and sometimes his truck would have a loud muffler in the wee hours of the morning. Often as not the morning dew or the lawn sprinklers would soak the paper before we could retrieve it. On rainy mornings the paper arrived in a plastic bag that managed to protect about 3/4 of the paper from getting soaked. The newspaper company also published an on line edition once the power of the web was obvious, and like many other readers I took to it instantly and never looked back. Unfortunately for the newspaper, they lost money giving the news away for free on the web (duh), and they finally had to come up with a pay-for alternative. It involved a special digital edition that looked just like the printed version. In a scattergun approach to pleasing every customer from the grumpiest computer-hating Luddite to the early-adopter geek, they offered a plan to give you a print paper AND a digital edition.
We signed up. I like trying new stuff but I still like a print edition. This would be a chance to compare the technologies.
It’s been a couple of months now, so I feel as if I know where things are going. Both my wife and I read the print paper to some extent, and both of us use the newspaper’s website. The website is actually easy to use, but it is not the new so-called “digital edition” that looks exactly like the printed paper. For that, you have to log on to a special website. The newspaper sends a helpful link by email each day as a reminder. The digital look alike loads a web application in your browser window, after which you see the copy of the printed version in what amounts to a browser frame. Try as I might, I just cannot warm to the idea of trying to read a newspaper that way. The page does not all fit in the browser window, which means that you are constantly scrolling one way of another to read articles. Worse yet, because the digital look alike is supposed to be like the printed copy, you have to follow the story onto other pages buried deep in that day’s edition. The pages of the digital edition have a feature that prompts you with a cute little animation to turn them. Page turns themselves are also animated. Ooooo! This is digital bling! It looks so cool, but let’s face it – I think having to scroll left and right and up and down, then fiddle with the mouse to get the cursor exactly in the right spot to connect me to the remainder of a front-page article that ends up buried on page 10 is just not my cup of tea. What I want is content. I would like it to be easy to find, easy to read, and – after being in the business of helping people with disabilities for so many years – accessible to people who use screenreaders. I have to say that some of these new digital publishing efforts fall flat on all those counts.
What I don’t really understand is the need to make a digital edition look like a printed page. The printed page is fine when it is a printed page. When it is a digital copy on a small screen, it is like putting Victorian furniture in a Frank Lloyd Wright house. It is a bad fit. If you are going to use the web to publish your newspaper, publish it using the easily understood, common, and highly accessible web page formats that are already available. That is why for Handiham World we provide accessible HTML in our web pages. If we put something up in a format like PDF, it contains embedded text and an audio alternative, plus an HTML version. But really, the PDF version is not meant so much to be read on line as to be printed and read as a print publication.
The bottom line with digital publishing is that it needs to be recognized for what it really is – a new and better way to deliver content that is more up to date, cheaper to deliver, and takes advantage of the technology to allow users to search thousands of pages quickly, have access to past issues without collecting an attic full of paper copies, and enjoy it all with accessible technology. It is not a new way to deliver the same old paper dressed up with page turn animations. In other words, forget the bling and give me the content.
Oh, well. At least the digital version does not drive over my lawn at 4:00 A.M. in a noisy truck. On the down side, I miss the plastic bag that is so handy for “dog duty” when I take Jasper out for a walk.
For Handiham World, I’m…
Patrick Tice, [email protected]
Handiham Manager
Pat Tice, WA0TDA, is the manager of HANDI-HAM and a regular contributor to AmateurRadio.com. Contact him at [email protected].
 Ham Radio Deluxe |
 W5SWL Electronics |
 Ham Radio Prep |
 KB3IFH QSL Cards  Hip Ham Shirts  HamRadioAuctions HamRadioAuctions Reliance Antennas Reliance Antennas Enigma Shop Enigma Shop |  morseDX  Ni4L Antennas  R&L Electronics R&L Electronics antennas.us antennas.us QRV QRV |
- Matt W1MST, Managing Editor
