 |
 Autumn Antenna Adventures Again….
…with Arduino.
I’m not well versed in mechanics. Motors, gears, bearings….not my forte. I know how to work with wood, but not with metal. However, as a ham you should posses some mechanical skills, right? How else will you get these antennas built, up in the air on a tower, with a rotor to move them?
So, for tuning my loop I decided to learn something new and use a stepper motor to turn the variable capacitor. Amazing things, these stepper motors! There was a lot to read about them, like the types (unipolar or bipolar), stepcount, gearing and wiring.
In the Arduino beginners kit I bought for my son there was a small stepper motor, the 28BYJ-48. It’s a 5 Volt motor, so a perfect fit for an Arduino.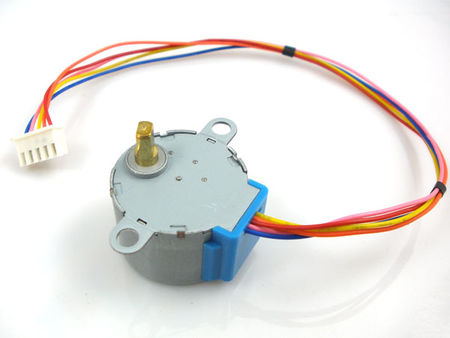
I “salvaged” it from my son’s room and hooked it up. Here is a web page about it with all the specs. There is also a code sample on that page and it shows that controlling a stepper motor is not difficult at all. But the code uses a lot of switch statements and that gets unwieldy very quickly.
In such cases a library will help out. A library is just that: a place to look up code to use in your own code. This is usually done by referencing to it and as long as your library is included in your IDE you are good to go. To understand more about how libraries work and how to write one yourself I found this tutorial on the web. I followed it and indeed ended up with my own library to control the stepper motor.
But don’t worry, you don’t have to write every library you need. For almost any input or output device there is a library available and the most basic ones are included in the Arduino IDE. If not, a quick search on the web will yield one you can use, but then you will have to install it yourself (not difficult if you use the Arduino IDE).
With the library installed code looks like this….

The first of the three block of the code has two lines:
#include StepperMotor.h
 StepperMotor myMotor(8,9,10,11);
The first line doesn’t need explaning, except that libraries usually end in “.h”. In this case my library is simply called StepperMotor.h.
Now I might have more than one stepper motor hooked up to my Arduino, so I have to make it clear which motor I’m using. Here I use only one motor, so my code reads:
StepperMotor myMotor(8,9,10,11);
In plain English this says that in my code any mention of “myMotor” will reference to the StepperMotor library and it will use the motor connected to pin 8 through 11. If I would have used two motors my code it would have been…
StepperMotor myMotorOne(8,9,10,11);
 StepperMotor myMotorTwo(4,5,6,7);
In the setup I add this:
myMotor.setStepDuration(1);
In the library there is a function to set the duration of one step. By simply referencing to is and adding a value between the brackets it has been set. I don’t have to worry about the code that sets the step duration, because the library takes care of it all. Ease and simplicity at its finest.
Now I can control my stepper motor in the loop block:
 myMotor.step(4800);
 delay(2000);
 myMotor.step(-4800);
 delay(2000);
myMotor.step() looks up the library function to move the motor and then moves it 4800 steps. After a delay of 2 seconds it moves the motor back 4800 steps. Another 2 second delay and the process repeats itself.
Fine and dandy, but this code might only be useful for moving an advertisement sign, not much else. In my case I needed to control a variable capacitor, so mounted everything on a piece of plexi glass, added a few push buttons and the result looks like this…..
In the end there was a lot more that needed to be added to get it working perfectly. Preventing button bounce was one thing, limit switches were another. Physical limit switches were not an option, so I devised a software solution. To go from maximum capacity (500pF) to minimum capacity (9pF) the stepper motor needs 11000 steps. In my code I therefore added a counter and as long as this counter stays between 100 and 10900 the stepper will work. Now I don’t have to worry about stressing the stepper motor when it reaches either end of the capacitor. By putting the counter’s value in the Arduino’s Eprom I can switch the loop off without losing its settings.
With this part of the project done it’s time to put everything together and box it up.
 Ham Radio Deluxe |
 Ham Radio Prep |
 KB3IFH QSL Cards  Hip Ham Shirts  HamRadioAuctions HamRadioAuctions Reliance Antennas Reliance Antennas Enigma Shop Enigma Shop |  morseDX  Ni4L Antennas  R&L Electronics R&L Electronics antennas.us antennas.us Ears to Our World Ears to Our World |
- Matt W1MST, Managing Editor
